September 4, 2024

Mastering Verilog: Implementing a 4:1 Multiplexer (MUX)

Welcome back to our Verilog series! In this blog post, we’ll explore the implementation of a 4:1 Multiplexer (MUX) in Verilog. A multiplexer is a crucial digital circuit used to select one of several input signals and route it to a single output line based on a control signal.

Understanding how to implement a 4:1 MUX is vital for designing complex digital systems.

Below are the Verilog codes for a 4:1 multiplexer using two different modeling styles: Dataflow and Behavioral.

1] Dataflow Modeling:

In dataflow modeling, we use the select signal to choose between one of the four inputs.

module mux(y, s, i);
input [3:0] i; // 4-bit input vector
input [1:0] s; // 2-bit select signal
output y; // Output
assign y = i[s]; // Select one of the 4 inputs based on s
endmodule

Explanation:
‘assign y = i[s];’ uses the select signal ‘s’ to index into the 4-bit input vector ‘i’, selecting one of its elements to be assigned to ‘y’.

2] Behavioral Modeling:

In behavioral modeling, we use a ‘case’ statement within an ‘always’ block to describe the multiplexer’s functionality.

module mux(y, s, i);
input [3:0] i; // 4-bit input vector
input [1:0] s; // 2-bit select signal
output reg y; // Output
always @(*) begin
case (s)
2'd0: y = i[0]; // If s is 00, output i[0]
2'd1: y = i[1]; // If s is 01, output i[1]
2'd2: y = i[2]; // If s is 10, output i[2]
2'd3: y = i[3]; // If s is 11, output i[3]
default: y = 1'b0; // Default case for safety
endcase
end
endmodule

Explanation:

  • The always@(*) block ensures that ‘y’ is updated whenever there is a change in ‘s’ or ‘i’.
  • The ‘case’ statement selects one of the four inputs based on the value of ‘s’.

Conclusion

These Verilog implementations showcase how to model a 4:1 Multiplexer using different design approaches: dataflow and behavioral. Understanding these modeling styles will help you design and implement multiplexers effectively in your digital circuits.

What’s Next?

Explore these MUX implementations in your Verilog projects and experiment with variations to deepen your understanding. In the next post, we’ll dive into more complex digital circuits and their Verilog implementations.

Happy Coding!

Mastering Verilog: Part 9 — Diving into Tasks and Functions

In our ongoing journey to master Verilog, we’ve explored various foundational concepts and advanced features. In this segment, we will focus on two crucial constructs in Verilog programming: Tasks and Functions. Understanding these constructs is essential for creating modular, reusable, and efficient Verilog code.

1. Introduction to Tasks and Functions

Tasks and functions in Verilog are used to encapsulate and reuse code. They help in organizing code into manageable pieces, making it more readable and maintainable. While both tasks and functions serve similar purposes, they have distinct characteristics and use cases.

Often, we encounter repetitive code segments in RTL (Register Transfer Level) that are invoked multiple times. These segments typically do not consume simulation time and often involve complex calculations with varying data values. In such instances, declaring a function to encapsulate the repetitive code can be highly beneficial. A function allows you to process inputs and return a single value, reducing the amount of RTL code you need to write. By calling the function and passing the necessary data for computation, you streamline your code and avoid redundancy.

In contrast, a task is more versatile. Tasks can handle multiple result values, returning them through output or inout arguments. They can include simulation time-consuming elements like ‘@’ or ‘posedge’. While functions do not consume simulation time and return only a single value, tasks may or may not consume simulation time and can return values via output or inout arguments.

Verilog Tasks

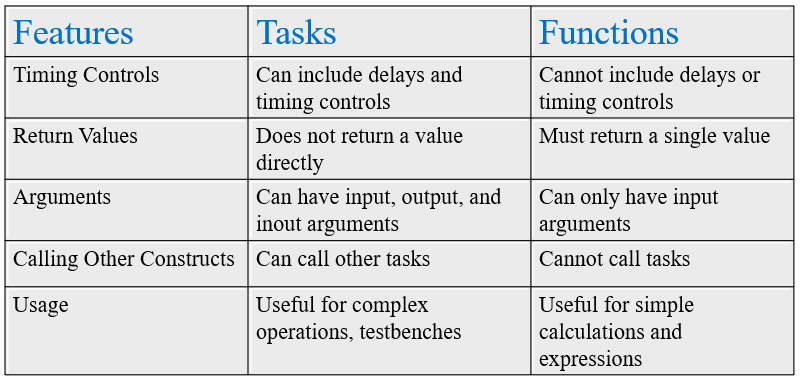
A task in Verilog is used to perform a sequence of statements and can include delays and timing control. Tasks are useful for operations that may require multiple statements and potentially involve waiting periods.

Syntax:

task task_name;
// Input and output declarations
input [width-1:0] input_name;
output [width-1:0] output_name;

// Task body
begin
// Task operations
end
endtask

Example:

module TaskExample;
reg [7:0] a, b;
reg [7:0] result;

// Task Definition
task add_two_numbers;
input [7:0] num1, num2;
output [7:0] sum;
begin
#5 sum = num1 + num2; // Perform addition with a delay
end
endtask

initial begin
a = 8'd10;
b = 8'd20;
add_two_numbers(a, b, result); // Call the task
$display(“The result of addition is: %d”, result);
$stop;
end
endmodule

Explanation:
Task Definition: ‘add_two_numbers’ takes two inputs (‘num1’ and ‘num2’) and provides an output (‘sum’), with a delay of 5 time units before computing the sum.
Task Call: The task is invoked in the ‘initial’ block to perform the addition.

Key Features of Tasks:
- Can contain delays and timing controls.
- Can have input, output, and inout arguments.
- Can call other tasks.
- May or may not consume simulation time, depending on their contents.

Verilog Functions

A function in Verilog is used for computing a value and returning it. Functions are typically used for simple calculations and must return a single value. They cannot contain delays or timing controls.

Syntax:

function [return_width-1:0] function_name;
input [input_width-1:0] input_name;
// Function body
begin
function_name = expression; // Compute and return value
end
endfunction

Example:

module FunctionExample;
reg [7:0] a, b;
reg [7:0] result;

// Function Definition
function [7:0] add_two_numbers;
input [7:0] num1, num2;
begin
add_two_numbers = num1 + num2; // Compute the sum
end
endfunction

initial begin
a = 8'd15;
b = 8'd25;
result = add_two_numbers(a, b); // Call the function
$display(“The result of addition is: %d”, result);
$stop;
end
endmodule

Explanation:
Function Definition: ‘add_two_numbers’ takes two inputs and returns their sum.
Function Call: The function is called in the ‘initial’ block to compute and return the result.

Key Features of Functions:
- Cannot contain delays or timing controls.
- Must return a single value.
- Cannot call tasks.
- Can be used within expressions.

Differences Between Tasks and Functions

Practical Examples

  1. Task Example
    Suppose you are designing a complex digital system where you need to perform a sequence of operations with delays. A task can be used to encapsulate this logic and improve code readability.
  2. Function Example
    For simple calculations such as computing a checksum or performing bitwise operations, functions can be used within expressions to streamline your code.

Conclusion

Tasks and functions are powerful constructs in Verilog that enable modular, reusable, and efficient coding practices. Tasks are suited for complex operations with timing controls, while functions are ideal for simple computations. By encapsulating repetitive code segments in functions and leveraging tasks for more complex operations, you can enhance code maintainability and efficiency. Mastering these constructs will elevate your ability to design and verify digital systems effectively.

Stay tuned for more insights and advanced topics in our mastering Verilog series!

September 3, 2024

Mastering Verilog: Implementing a 2:1 Multiplexer (MUX)

Welcome back to our Verilog series! In this blog post, we’ll explore the implementation of a 2:1 Multiplexer (MUX) in Verilog. A multiplexer is a fundamental digital circuit used to select one of several input signals and route it to a single output line based on a control signal.

Understanding how to implement a 2:1 MUX is essential for designing more complex digital systems. For a detailed insight into how a 2:1 MUX operates, including its truth table and operational principles, click on the link provided below:

2:1 Multiplexer: Detailed Overview and Truth Table

Below are the Verilog codes for a 2:1 multiplexer using two different modeling styles: Dataflow and Behavioral.

1] Dataflow Modeling:

In dataflow modeling, we describe the multiplexer behavior using the ternary operator to select between inputs based on the control signal.

module mux(y, s, i);
input [1:0] i; // 2-bit input vector
input s; // Select signal
output y; // Output
assign y = s ? i[1] : i[0]; // MUX functionality: if s is 1, output i[1]; otherwise, output i[0]
endmodule

Explanation:
‘assign y = s ? i[1] : i[0];’ uses a conditional operator to select between ‘i[1]’ and ‘i[0]’ based on the value of ‘s’.

2] Behavioral Modeling:

In behavioral modeling, we use an ‘always’ block to describe the multiplexer’s functionality in a more descriptive manner.

module mux(y, s, i);
input [1:0] i; // 2-bit input vector
input s; // Select signal
output reg y; // Output
always @(*) begin
if (s) // If s is 1, select i[1]
y
= i[1]; // Output i[1]
else
y = i[0]; // Otherwise, output i[0]
end
endmodule

Explanation:

  • The always@(*) block ensures that ‘y’ is updated whenever there is a change in ‘s’ or ‘i’.
  • The ‘if-else’ construct is used to determine the value of ‘y’ based on the value of ‘s’.

Conclusion

These Verilog implementations showcase how to model a 2:1 Multiplexer using different design approaches: dataflow and behavioral. Understanding these modeling styles will help you design and implement multiplexers effectively in your digital circuits.

What’s Next?

Explore these MUX implementations in your Verilog projects and experiment with variations to deepen your understanding. In the next post, we’ll dive into more complex digital circuits and their Verilog implementations.

Happy Coding!

September 2, 2024

Mastering Verilog: Part 10 — Understanding parameter and generate Constructs

When working with Verilog, two constructs that can greatly enhance the flexibility and reusability of your code are parameter and generate. These constructs allow you to create more modular and adaptable designs. In this blog, we’ll delve into how these features work and how you can use them effectively in your Verilog code.

Understanding parameter in Verilog

The parameter keyword in Verilog is used to define constants that can be used throughout your module. Parameters allow you to make your design more flexible by allowing you to modify the behavior of your module through parameterization rather than hardcoding values.

  • Why Use Parameters?
  1. Flexibility: Parameters allow you to easily change values without modifying the core module code.
  2. Reusability: You can create more generic and reusable modules by adjusting parameters.
  3. Readability: Using parameters can make your code more readable and maintainable.
  • How to Define and Use Parameters
    To define a parameter, use the following syntax:
module my_module #(parameter WIDTH = 8, parameter DEPTH = 16) (
input [WIDTH-1:0] data_in,
output [WIDTH-1:0] data_out
);
// Module implementation
endmodule

In this example, WIDTH and DEPTH are parameters with default values of 8 and 16, respectively. You can override these default values when you instantiate the module:

my_module #(.WIDTH(16), .DEPTH(32)) instance1 (
.data_in(data_in_16),
.data_out(data_out_16)
);

Example: Parameterized Adder

Objective: Create a simple parameterized adder module that can be configured for different bit-widths.
Code:

module adder #(parameter WIDTH = 8) (
input [WIDTH-1:0] a,
input [WIDTH-1:0] b,
output [WIDTH-1:0] sum,
output carry_out
);
assign {carry_out, sum} = a + b;
endmodule

Explanation:

  1. parameter WIDTH = 8: This parameter allows you to specify the width of the adder. The default value is 8 bits.
  2. input [WIDTH-1:0] a, b: Inputs a and b are vectors with a width specified by the WIDTH parameter.
  3. output [WIDTH-1:0] sum: The output sum has the same width as the inputs.
  4. assign {carry_out, sum} = a + b: Adds a and b, assigning the sum and carry-out.

Instantiation:

adder #(.WIDTH(4)) adder_4bit (
.a(4'b1010),
.b(4'b0101),
.sum(sum_4bit),
.carry_out(carry_out_4bit)
);
adder #(.WIDTH(16)) adder_16bit (
.a(16'h1234),
.b(16'h5678),
.sum(sum_16bit),
.carry_out(carry_out_16bit)
);

This example creates two instances of the adder module: one with a 4-bit width and another with a 16-bit width.

Exploring generate in Verilog

The generate construct is used to create multiple instances of a module or logic based on a parameter or a condition. This can be particularly useful for generating repetitive structures such as arrays of registers or counters.

  • Why Use Generate?
  1. Code Reduction: Helps reduce repetitive code by allowing you to generate multiple instances or structures with a single block of code.
  2. Conditional Instantiation: Allows you to instantiate modules or logic conditionally based on parameters.
  • Basic Syntax of Generate
    The generate construct is used in conjunction with genvar and for loops to create multiple instances:
module generate_example #(parameter N = 4) (
input [N-1:0] in,
output [N-1:0] out
);
genvar i;
generate
for (i = 0; i < N; i = i + 1) begin : gen_block
assign out[i]
= in[i]; // Example: copying input to output
end
endgenerate
endmodule

In this example, the generate block creates N instances of the assign statement. The genvar keyword is used to declare a variable for use in the generate block.

Example: 2-to-1 Multiplexer Array

Objective: Use generate to create multiple instances of a 2-to-1 multiplexer.
Code:

module mux2to1 #(parameter WIDTH = 8) (
input [WIDTH-1:0] a,
input [WIDTH-1:0] b,
input sel,
output [WIDTH-1:0] y
);
assign y = sel ? b : a;
endmodule

module top_module #(parameter NUM_MUX = 4) (
input [NUM_MUX*8-1:0] data_in,
input [NUM_MUX-1:0] sel,
output [NUM_MUX*8-1:0] mux_out
);
genvar i;
generate
for (i = 0; i < NUM_MUX; i = i + 1) begin : mux_gen
mux2to1 #(.WIDTH(8)) mux_instance (
.a(data_in[i*8 +: 8]),
.b(data_in[(i+1)*8-1 -: 8]),
.sel(sel[i]),
.y(mux_out[i*8 +: 8])
);
end
endgenerate
endmodule

Explanation:

  1. mux2to1 Module: A parameterized 2-to-1 multiplexer with a configurable data width.
  2. top_module: Uses a generate block to create multiple instances of the mux2to1 module.
  3. genvar i: A generate variable used to iterate through the for loop.
    for (i = 0; i < NUM_MUX; i = i + 1): Loop generates NUM_MUX instances of mux2to1.
  4. data_in[i*8 +: 8]: Extracts an 8-bit segment from data_in for the a input.
  5. mux_out[i*8 +: 8]: Collects the output from each multiplexer instance.

Instantiation:

top_module #(.NUM_MUX(4)) top_instance (
.data_in({32'hA5A5A5A5, 32'h5A5A5A5A, 32'hFFFF0000, 32'h0000FFFF}),
.sel(4'b1010),
.mux_out(mux_out)
);

In this example, top_instance creates a 4-way multiplexer where each instance of mux2to1 is configured to select between pairs of 8-bit inputs.

Conclusion

The parameter and generate constructs in Verilog provide powerful tools for creating flexible, reusable, and efficient designs. Parameters enable you to adjust module behavior and design size without modifying the core module, while the generate construct helps in managing repetitive structures and conditional instantiation.

By mastering these constructs, you can enhance the adaptability and maintainability of your Verilog code, making it more robust and scalable for complex designs.

Explore Our Topics!

Check out the extensive list of topics we discuss:  Communication Protocols: -  USB   - RS232   -  Ethernet   -  AMBA Protocol: APB, AHB and...